We are moving!!! Same Fun, Crafts, and Recipes, but a new and official web address! Come check out what is new at...


FunOnaDime.net


See you there!
Showing posts with label All Ages. Show all posts

Preserving Leaves and the Fall Colors

All Fall we have been waiting for the leaves to change colors and fall off the trees. They finally decided to change colors a couple of weeks ago and over the weekend they all started blowing away. We were able to grab some of our favorite colors and we attempt to preserve them.


READ MORE on how to preserve your Fall leaves over at my new official site funonadime.net

Make Your Own Movie

Who doesn't like to be the star of their own show? Most children I have met love to watch themselves "on film" over and over and over. A great activity is to create a short film and let them be the stars. With the wide availability of digital cameras and their video capabilities this can be a pretty entertaining activity for even older children/teenagers. My neices will spend hours prepping scripts and props and then recording their short film (usually in one take, so they do not have to edit.) It keeps them entertained, gets their brains working and they always love the results!

Read more over at Funonadime.net and see our first short film!


P.S. Remember, there is a gift card coming from CSN Stores and all link participation in the Friday Brag Fests and the October Fun Challenge will count as bonus entries! Come join in on the fun!


Ladybug Rocks


We did this craft a few weeks ago when we were talking about the Letter L. The children had fun exploring in the rocks to find the “perfect” rock for their bug and it gave us a great opportunity to talk in more detail about Ladybugs. This was a super simple project to do and the possibilities are endless on what you can create!


Read more.... I've moved over to my new site, http://funonadime.net/. Come on over and see the rest of this tutorial!


The Best Flying Paper Airplane

This is the first post that I ever wrote on this blog. I thought it would be fun to bring a little blast from the past (9 months ago!).

This is the best paper airplane we have ever flown and very easy to fly. Paper airplanes are a great activity for those days when you can not go outside or are confined to a small space, like the gym childcare area. They are simple, you most likely have all the supplies you need on hand and are always a huge hit for any age. I did this with ages 2-4 years old. My 13 year old sister and 3 of her friends even tested it out for me. They had so much fun that they played with them for 3 hours and I was told they had a blast. They ended up naming their planes and having all sorts of competition.


What You Need:

  • Paper
  • Tape
  • Crayons (optional)

Directions:
First, we had to add a little color before we started folding. Notice how the boys were all about getting it done as fast as possible. The girls were a little more detailed oriented when it came to coloring!


Once that is done, the folding begins. Each step has a number next to the picture to make it a little easier to follow. I also colored the back side of the paper green, so you can tell which side is which while we are folding.

Let's begin! Each picture is number for the Step that it belongs to. For instructional purposes, one side is white and the other is green scribbles. If you would like a larger view, click on the picture.

Step 1: Lay paper on a flat surface. (See picture below)

Step 2: Fold the paper length wise in half. (See picture below)

Step 3: Open the paper up again. Take one corner and fold it in towards the center line. (See picture below)

Step 4: Do the same to the opposite corner.


Step 5: Flip the paper over. (See picture below)

Step 6: Pull the new corner, just created in and in line with the center line.(See picture below)

Step 7: Do the same to the opposite corner.(See picture below)

Step 8: This is what it should look like right now when it is folded in half.


Now this next part is a little tricky, so much sure you follow the pictures

Step 9.1: I put 2 red dots on the paper. See them? On the next fold, you will bring the red dots together by bringing the edge on the bottom up. Basically folding it in half on the one side. (See picture below)

Step 9.2: I guess to make it easier on me I flipped it around and I didn't notice it until now. Sorry! This picture is folding the edge (that is pictured in 9.1 on the bottom) to line up with the opposite edge. (See picture below)

Step 10: Flip the plane over and do the same to the other side.


Step 11: This is what your plane should look like from the side when your hand is holding the fold. Now you want to put a little piece of tape on the bottom going over the fold . Somewhere near my thumb is fine. (See picture below)

Step 12: You also want to put a piece of tap on the top holding the two sides together. About where the red line is.


Step 13: Have some fun! We did!

Getting ready to have a throwing competition!

And they are off!

Enjoy!


** This original post was posted on January 22, 2010. I rewrote it a little so it could match my formatting I have adopted over the past 9 months of writing my blog and moved some pictures around. At the time I thought it would work well to put 3-4 pictures together in one, but now going over it, I think it may be better to have the pictures separated. .I am participating in the SITS Girls Back to Blogging Event with their sponsors Standards of Excellence, Westar Kitchen and Bath, and Florida Builder Appliances.

Ice Breaker Experiment


{**GiVeAwAy** $40 CSN Stores Gift Card - Leave a comment}

~~~~~~~~~~~~~~~~~~~~~~~~~~~~~~~~~~~~~~~~~~~~~~~~~~~~~~~~~~~~~~~


This project originally started out with a science experiment that I thought would be a little difficult for my kids to understand. Did  you know salt water does not freeze? The suggestion for the experiment was to freeze regular water in half of an ice cube tray and in the other half freeze salt water. After a couple of hours when you pull the ice out, you would see that the regular water melts and the ice water does not melt. So, I came up with this variation for the kids to play around with....


What You Need:
  • Salt
  • Water
  • Little bowls or plates
  • Mini toys or small objects
  • Container - size depends on how big you want your block of ice to be
  • Ice cubes
  • Optional: random tools or kitchen gadgets

Directions:

Step 1: Make a large ice block in a large container (mine was not huge, just a storage container). i filled it with cold water and mini toys and/or objects (mini Lego men, pen top, crayon, a glow in the dark snake, money - some sink, some float, just stuff that is on hand!). I added lots of ice to speed up the process and then put it in the freezer. The ice helped keep the toys separated and at various levels and it froze in just over 1.5 hours. 

Step 2: I started out giving a small bowl with a piece of ice to each child. Then I gave them some sugar to sprinkle on the ice to see what happens


Step 3: Then I gave them some salt. Wit the salt the ice starts melting quickly. We talked about what they saw and made sure they all noticed the ice melting quickly.


Step 4: After experimenting, I pulled out the big block of ice that I created and put it on the table in front of them. They saw their toys and the money and got really concerned and wanted to get them out! So, I had them tell me what they could do to get them out.


They tried knives...


Then they decided that forks might be better. I had to give each of them a turn to chip away at it because they were getting a little scary. They really enjoyed this part a little too much!


I reminded them of the little ice cubes and then they asked for the salt.

They each got a turn to sprinkle (and they wanted to keep stabbing it with the forks, too.)


It was a slow process, but they had a lot of fun. Once it started melting, it really started shrinking.


Next time I am going to make a really huge block of ice or make multiple ones of the one above and let the kids at them in the backyard. The 20-30 minutes we spent on breaking up this ice block was not enough for them!

It was fun for all who watched and participated!

This is the underside once we were able to flip it over.

ENJOY!!


Oh, and check out here to get a code for a Free Month Membership to Readeo.com


Storytime Online


Homemade Granola Bars

Business first....

  1. Don't forget to enter the Giveaway - $40 CSN Stores Gift Card - Just leave a comment!
  2. Also, I am going to be starting a newsletter in September...make sure you sign up over there on the right! Alright, alright and if you do sign up, you will get an extra entry into the Giveaway!


~~~~~~~~~~~~~~~~~~~~~~~~~~~~~~~~~~~~~~~~~~~~~~~~~~~~~~~~~~~~~~~


School is almost in session for everyone. If your kids are like mine, they love granola bars. I decided to give making my own a try. I could not find a recipe that I liked, so I made up my own from what I saw the other recipes were made of and what I had on hand. They turned out great! And the best thing is...they have a lot of healthy ingredients and since my kids helped me make them, they were much more willing to eat them, too. Give them a try and let me know what you think!

Granola Bars


What You Need:
  • 3/4 tsp. Cinnamon
  • 1/4 tsp Ground Ginger
  • 1/8 - ish tsp Nutmeg (depending on how strong of a nutmeg flavor you want)
  • 1/4 cup Olive Oil
  • 1/2 cup Honey
  • 1 1/2 tsp. Vanilla extract
  • 1 egg
  • 1 cup All-Purpose Flour
  • 2 cups Rolled Oats - Measure and then blend
  • 1/2 tsp Salt
  • 1/2 cup Wheat Germ
  • 3/4 cup Brown Sugar
  • 1/4 cup Applesauce
  • 1/4 cup Craisins
  • 3/4 cups chopped Nuts (I used 1/4 cup Pecans, 1/2 cup Nut Mix (Pumpkin, Sunflower, Pine Nut, Almond)
  • 1/2 - 3/4 cups Milk Chocolate Chips (or White Chocolate Chips or a mix of both!)
  • 2 large bowls
  • Mixing spoon
  • 9x13 pan
  • Wax paper

Directions:

Step 1: Mix dry ingredients together (oats, flour, salt, wheat germ, sugar, nuts, dried fruit). I mixed them all up and threw them into the blender/food processor to get a nice even blend. The less texture, the less questions I have about what is in it or phrases like "I don't like it"!

Granola Bars

Step 2: Mix liquid and Spices together. I like to taste it here (before I add the egg) and add more cinnamon or nutmeg to see if it is what I like.

Granola Bars

Step 3: Mix liquid and dry ingredients together until evenly mixed. The mix should be sticky, not too dry, but not sticky enough that tons get stuck to your hand when you touch it.


Step 4: Toss in Chocolate Chips and quickly mix. The milk chocolate chips will melt if mixed up too much.

Granola Bars

Step 5: Preheat oven to 350 degrees. Spray cooking spray into a 9x13 pan and then lay wax paper in the pan. The spray will hold the wax paper down and the wax paper will let you get the bars out easier once cooked.


Step 6: Press the mix into the pan. I found it was easier if I sprayed my hand with a little cooking spray. Then the mix did not get stuck to my hand and I could press it easier.

Granola Bars

Step 7: Bake for 25 - 30 minutes or until edges are golden brown.


Step 8: Remove from oven and let the pan cool completely. Slice into mini granola bars store in a sealable plastic bag. Ours never last long enough to freeze, but plan on freezing if you are not going to eat them quickly.

Granola Bars

***Note: The nuts make a huge taste difference. I thought these tasted amazingly better with pecans than when I made them with walnuts...but that is just me!

Enjoy!

How To Make Great Tinfoil Dinners

My heart has been aching for the Sullenger Family during this hard time. It has been reminding me to cherish each moment.

~~~~~~~~~~~~~~~~~~~~~~~~~~~~~~~~~~~~~~~~~~~~~~~~~~~~~~~


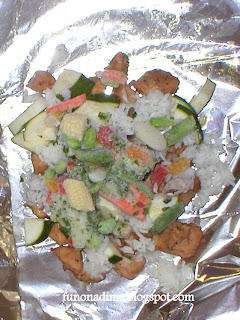
We have been having a lot of fun lately experimenting with tinfoil dinners and trying all sorts of variations. They are so easy to put together and pretty much anything tastes great once cooked. Here are a few of our favorites:


The Basic

The basic tinfoil dinner is fool proof and is a great starter for any tinfoil meal. You can pretty much add anything and it will taste great! This is my husband's favorite.


What You Need:
  • 1 serving meat
  • 2 cups veggies
  • Salt
  • Pepper
  • Oil
  • (Optional) Some sort of sauce: Creme of chicken/mushroom, BBQ sauce, or just a bit of Oil (we like Olive Oil) or anything else you want to try

Directions:

Step 1: Cut a piece of tinfoil about 15 -18 inches long. Lay it out shiny side up. If the shiny side is down, it will NOT cook- the shiny side will reflect the heat away.

Step 2: Spray or spread a little oil on the tinfoil. Add your meat and veggies. Salt and pepper to taste.

Step 3: Wrap up the tinfoil by pinching the two long edges together and rolling down and then rolling the ends together in.

Step 4: Wrap with second piece of tinfoil (shiny side up!)


Cajun Rice

This one is soooo yummy! I was pleasantly surprised!


What You Need:
  • 1 cup cooked rice
  • 1 cup black beans
  • 1/2 cup salsa
  • 1 serving meat - Sausage or polish hot dog are great!

Directions:

Step 1: Spray or spread a little oil on a 15-18 inch piece of tinfoil (shiny side up).

Step 2:  Place the rice on the tinfoil and create a little "nest" with a hole in the middle.

Step 3: Add cut up meat.

Step 4: Separately ix salsa and black beans together and pour on top of meat.

Step 5: Wrap the tinfoil up and re wrap a second time. Cook for 10 - 20 minutes until heated.


Chicken Stir-fry

This is also a really good meal and it has more veggies which make it feel healthier!


What You Need:
  • 3/4-1 cup cooked cups rice
  • 4 T Teriyaki Sauce (or Soy Sauce)
  • 4 T water
  • 1 T sugar
  • about 1/4 tsp garlic powder
  • about 1/4 tsp pepper
  • 1 - 1 1/2 cups  vegetables
  • 1 serving bite sized pieces of chicken
  • Tinfoil
  • Large plastic container or 1 gallon sealable bag

Directions:

Step 1: Prepare 2 cut pieces of tinfoil (shiny side up!). Add spray or spread the top one with oil. You will want the 2nd one ready to go once you fold the 1st one up at the end of the recipe. Have your container or sealable bag nearby, as well.

Step 2: Combine Teriyaki sauce, water sugar, garlic powder and 1/4 tsp pepper in a separate bowl and marinade the chicken for 10-15 minutes. Chicken can be raw or cooked (leftovers work great!)

Step 3: Add cooked rice and form a nest.

Step 4: Remove chicken from marinade and add the chicken inside the "nest". It helps if you cook the chicken a little until it is just a little pink, if it is not already, prior to adding it to the rice. It will cook faster this way. Put the marinade to the side for a minute.


Step 5: Add vegetables. I used 1 cup frozen and 1/2 cup zucchini.


Step 6: Fold 2 of the sides up, leaving the 3rd side open. Try to fold the second piece around the first on 2 sides as much as possible leaving the same side open. Pour the leftover marinade inside and wrap up. It will most likely leak, so place it in the sealable bag or container if you are preparing these ahead of time.


Helpful Tips:
  • It helps cook the dinner faster if you cook the meat and potatoes a little before adding to tinfoil.
  • Softer/more sensitive vegetables like green peppers, peas, etc. place in the middle of the meal (not near the tinfoil) to prevent burning
  • If you have the long 18 inch heavy duty tinfoil, it will be a lot easier. But I have used the smaller and very weak kind and it worked fine. I had to wrap one or two meals a 3 times, but the food still turned out great!
  • Prevent the potatoes from burning by covering them in a little oil. The easiest way to do this is to put them in a container with a little oil and shake them up.  
I remove them from the excess oil before adding them to the rest of the meal on the tinfoil.
 
 
Enjoy!!!


Teaching Constellations

Twinkle, twinkle little star....It is such nice weather outside at night and my son loves to lay outside on the grass and look up at the stars at night. Last summer he would beg us to stay outside until he saw a shooting star. I do not think he really knew what one was, but he knew that he would be able to stay up later until he saw one!

This activity turned out to be much more successful than I intended! It's simple and you probably have everything you need on hand...


What You Need:
  • Round cardboard container similar to an oatmeal container - minus the lid (see above) **
  • Pencil or pen
  • Paper
  • Tape
  • Push pin or thumb tack
  • Flashlight
  • A dark room (bathroom, closet, laundry room, etc.)
** See Variations below


Directions:

1. Trace a circle onto a piece of paper with your pen or pencil. Make it a little bigger than the hole on your container.


2.  Cut out your circle. Find a star chart and trace a few constellations onto the circle. We did the Big Dipper, Cassiopeia and the North Star (added that so that there is something to center them around). I found a book that had a few large enough and easy enough for me to trace. I am sure there are tons online.


3. Tape your circle onto the lid/open side of your round cardboard container (make sure lid is off). Then cut a hole in the bottom of the cardboard container big enough for your flashlight to fit into it.


4. Use a push pin to pop holes into the paper where the stars are. Move the pin around so it is a good, strong hole.


Sorry, white is so hard to photograph with my camera...but you get the general idea.


5. Go into a dark room big enough to fit your group and have some fun with the stars. My flashlight's beam was so strong that I had to aim the beam towards the side of the container and then we could see the "stars" a lot better.


6. Make sure you quiz their knowledge by turning the container and having them tell you where/what each constellation is. Start out with a couple and if they get the hang of it add more. I am sure they are going to surprise you! A couple of nights ago my children were laying on the grass out front waiting for their dad to get home when my 4 year old son said, "Hey Mom, look. There is the Big Dipper." And sure enough it was! Honestly, I did not think that he would really be able to find the constellations I showed him once we got outside because there are so many stars. That was one of those "I feel like a successful mom" moments!


Variations:
  • Try a box if you do not have a round oatmeal-ish container (It will just be harder to have more constellations on the paper)
  • Instead of the oatmeal container, use a heavy paper (like, card stock or poster board) and tape that directly onto the flash light. Make the constellations smaller and closer together. My flashlight was too strong of a beam to do this with. 

I am off to add some more constellations!


ENJOY!!!


P.S. I am being featured over at Or So She Says today! Come show me some love!

B is for Beads and Bracelets

{Leave a comment to win the Giveaway}

As part of our summer activities I have started to work through the alphabet with my children and a few friends. We have been doing 2 or 3 things per letter (on different days). Sometimes it is a craft, sometimes it is a food thing and sometimes it is something entertaining to do. So far, we have been having a lot of fun with it.


For the letter B we made Bead Bracelets with pipe cleaners. It ended up being a lot of fun and they were all so proud of their final project. Because we used pipe cleaners, even the 2.5 year olds were able to do it on their own with a little help to start out. Best part of this project is that it was pretty cheap. A little bag of 500 beads cost me less than $2 and I almost have a whole bag left!


I think we will have to do this again soon, since this is my daughter favorite piece of jewelry and she has been wearing it every day since we made them!


What You Need:
  • Beads
  • Pipe Cleaner (or yarn/string)

Directions:

It's pretty simple to figure out what to do. You just need to prevent the beads from falling off the bottom end by creating a swirl or knot with the pipe cleaner. And then let the children slide the beads on. I helped the 2 year olds put a couple on and they pretty much had it figured out from there.

If you use yarn, be sure to tape the end they will be using to slide on the beads. It will keep it from fraying.

For little wrists wrap the extra pipe cleaner around their wrist and then wrap each end around the section of bracelet it is near (see top picture). This will keep it the size you want and keep the beads from falling off.

**Make sure to leave the bracelet big enough to take on and off their wrist easily AND make sure to pinch in the very ends of the pipe cleaner when finished. They tend to pinch and scratch skin if not tucked away properly.


Variations:
  • Make an animal or a crown instead of a bracelet. My son combined a few pipe cleaners to make his own version of an animal (see above picture).
  • If you do not have any beads use a Fruit Loop/Cheerios type cereal or make some colored noodles and use those to create something.  

Enjoy!

Homemade Watercolor Paint


My daughter is our little artist. She really enjoyed the Chalk Paint we made, but she wanted to bring out the nicer (and smaller) paint brushes. So, I mixed up a smaller amount of the Chalk Paint recipe and let her at it with a fine tipped paint brush. It worked just as good as one of those store bought watercolor trays, but better! Better because it took out the step of having to dip the paint brush in water. That step always complicated things by making huge wet holes in the paper and then she would get really frustrated. She loves this and keeps asking to do it all the time!


This is my son's work


What You Need:

  • Cornstarch
  • Water
  • Food coloring
  • Container(s) - cupcake tin, mini cups, empty egg carton, etc
  • Paintbrush or mini sponges

Directions:

Step 1: Combine 1 part water and 1 part cornstarch. Stir together. I used a total of 1 T. water and 1 T. cornstarch.


Step 2: Divide up mixture into mini containers/cups. The egg carton works well for me, so I don't have to keep washing the cupcake tin. 


Step 3: Add one drop of food coloring to each container.


Step 4: Paint your heart out! You may have to add a little water if your child paints for a long time.


 Using the egg carton worked great! Note: The lighter colors are not as fun.


Variations:
  • If you want a custom color, like orange, you will want to prepare each color/container or mixture separately instead of all together at once. Double the water you want per container and add one drop red, one drop yellow. Then take the half that water and make your cornstarch/water mixture individually for each cup.
    • This also works well to delude the colors to get a more pastel look. 

  • If you do not have paint brushes or do not trust your kids with your nice ones, try using Qtips. They worked pretty good and it didn't matter if the kids were rough with them. We used one for each color to make it easier for more than one artist painting at a time.


Warning: The colors turn out really bright and look wonderful that way, but they may stain more.


Enjoy!!!


Movie Night: Theme Dog

{Giveaway}


When my niece was staying with us I let her help plan our first movie night. We tried to keep it simple and not go too extreme (which is easy to do). We had so much fun that this is now something I want to do once a month.


The Menu:

Dinner:  Chili Dogs...or plain hot dogs for the younger ones.


Movie:  We went to redbox and rented Cop Dog.


Picture from here


Movie Snack: We passed out some Puppy Chow that we made earlier that day. The kids were going crazy that they could not eat it right away and were probably even more excited for the movie because of the addition of a treat!


Enjoy your own movie night! I would love to know what you do.

Puppy Chow Recipe


This recipe has been a favorite in my family since I was a little girl. You have probably had it before, but know it as another name. I like this recipe because it does not have any extra butter or oil to add like a lot of other Puppy Chow recipes do and it is very simple. A great recipe for little helpers to do.


What You Need:
  • 4-6 cups Chex or Crispix cereal (generic is great)
  • 1 cup chocolate chips
  • 1/2 cup peanut butter
  • Powdered Sugar
  • 1 large bowl
  • A small pot or a microwave safe bowl
  • Long wooden or plastic spoon

Directions

Step 1:  Pour 4 cups of cereal into a large bowl. I buy whatever cereal is the cheapest, which is usually the generic Chex and I will buy one box rice cereal and one box corn to use for this recipe.

Step 2:  Combine peanut butter and chocolate chips. Heat until just melted. I usually use the microwave and stir it every 20-30 seconds. It usually takes no more than 1.5 minutes.

Step 3:  Pour melted chocolate peanut butter into the large bowl over the cereal a little at a time stirring it into the cereal. Try to cover all the cereal with chocolate, so keep mixing. If you need to, add more cereal. How much cereal you add depends on how chocolate coated you want each peace to be. If you use all 6 cups your cereal may be a bit dry.

Step 4: Add the powdered sugar. Stir it in until everything is covered. If you are like my little sister you want a TON of powdered sugar!

Step 5: Enjoy!


Variations:
  • Once you have mixed in the melted chocolate peanut butter put the mixture in a gallon sized sealable bag. Then add the powdered sugar. Seal the bag and shake. This can be less messy and it keeps the cereal from breaking up like it can when you are stirring with a spoon.
  • Divide up melted chocolate peanut butter mix into smaller sealable bags, so each of your helpers can shake up their own powdered sugar.

A funny story:... a few years ago I made some of this and grabbed a handful to take with us to the playground. A couple of friends heard me calling it Puppy Chow and giving it to my son. They finally came up and asked me what I was eating. When I told them I got the funniest look from both of them. So I opened up the paper towel I was holding to show them and told them how I made it. They both started laughing. They thought I was giving dog food to my son because they always called it something else growing up!

Quick Drying Pinata


When I think of 4th of July parties, for some reason I always picture a pinata there, too. And so I am currently working on one with my kiddos right now. Unfortunately, it is not done, yet (hopefully tomorrow) and so I am unable to post any pictures. BUT, I wanted to get this recipe out before the 4th so anyone who wants to do one has plenty of time.

I love this method for the pinata because you can do all 3 coats at once (instead of doing one layer at a time and waiting for it to dry before putting the next layer on.


Read More...CLICK HERE

...Sorry for the extra click. We've moved over to our own domain...


Site design by Fabulous K Creative | Powered by Blogger