We are moving!!! Same Fun, Crafts, and Recipes, but a new and official web address! Come check out what is new at...


FunOnaDime.net


See you there!
Showing posts with label Food Projects. Show all posts

How To Make Great Tinfoil Dinners

My heart has been aching for the Sullenger Family during this hard time. It has been reminding me to cherish each moment.

~~~~~~~~~~~~~~~~~~~~~~~~~~~~~~~~~~~~~~~~~~~~~~~~~~~~~~~


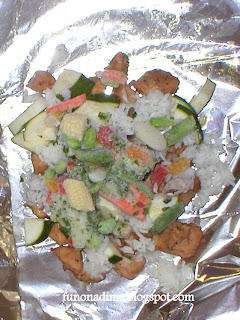
We have been having a lot of fun lately experimenting with tinfoil dinners and trying all sorts of variations. They are so easy to put together and pretty much anything tastes great once cooked. Here are a few of our favorites:


The Basic

The basic tinfoil dinner is fool proof and is a great starter for any tinfoil meal. You can pretty much add anything and it will taste great! This is my husband's favorite.


What You Need:
  • 1 serving meat
  • 2 cups veggies
  • Salt
  • Pepper
  • Oil
  • (Optional) Some sort of sauce: Creme of chicken/mushroom, BBQ sauce, or just a bit of Oil (we like Olive Oil) or anything else you want to try

Directions:

Step 1: Cut a piece of tinfoil about 15 -18 inches long. Lay it out shiny side up. If the shiny side is down, it will NOT cook- the shiny side will reflect the heat away.

Step 2: Spray or spread a little oil on the tinfoil. Add your meat and veggies. Salt and pepper to taste.

Step 3: Wrap up the tinfoil by pinching the two long edges together and rolling down and then rolling the ends together in.

Step 4: Wrap with second piece of tinfoil (shiny side up!)


Cajun Rice

This one is soooo yummy! I was pleasantly surprised!


What You Need:
  • 1 cup cooked rice
  • 1 cup black beans
  • 1/2 cup salsa
  • 1 serving meat - Sausage or polish hot dog are great!

Directions:

Step 1: Spray or spread a little oil on a 15-18 inch piece of tinfoil (shiny side up).

Step 2:  Place the rice on the tinfoil and create a little "nest" with a hole in the middle.

Step 3: Add cut up meat.

Step 4: Separately ix salsa and black beans together and pour on top of meat.

Step 5: Wrap the tinfoil up and re wrap a second time. Cook for 10 - 20 minutes until heated.


Chicken Stir-fry

This is also a really good meal and it has more veggies which make it feel healthier!


What You Need:
  • 3/4-1 cup cooked cups rice
  • 4 T Teriyaki Sauce (or Soy Sauce)
  • 4 T water
  • 1 T sugar
  • about 1/4 tsp garlic powder
  • about 1/4 tsp pepper
  • 1 - 1 1/2 cups  vegetables
  • 1 serving bite sized pieces of chicken
  • Tinfoil
  • Large plastic container or 1 gallon sealable bag

Directions:

Step 1: Prepare 2 cut pieces of tinfoil (shiny side up!). Add spray or spread the top one with oil. You will want the 2nd one ready to go once you fold the 1st one up at the end of the recipe. Have your container or sealable bag nearby, as well.

Step 2: Combine Teriyaki sauce, water sugar, garlic powder and 1/4 tsp pepper in a separate bowl and marinade the chicken for 10-15 minutes. Chicken can be raw or cooked (leftovers work great!)

Step 3: Add cooked rice and form a nest.

Step 4: Remove chicken from marinade and add the chicken inside the "nest". It helps if you cook the chicken a little until it is just a little pink, if it is not already, prior to adding it to the rice. It will cook faster this way. Put the marinade to the side for a minute.


Step 5: Add vegetables. I used 1 cup frozen and 1/2 cup zucchini.


Step 6: Fold 2 of the sides up, leaving the 3rd side open. Try to fold the second piece around the first on 2 sides as much as possible leaving the same side open. Pour the leftover marinade inside and wrap up. It will most likely leak, so place it in the sealable bag or container if you are preparing these ahead of time.


Helpful Tips:
  • It helps cook the dinner faster if you cook the meat and potatoes a little before adding to tinfoil.
  • Softer/more sensitive vegetables like green peppers, peas, etc. place in the middle of the meal (not near the tinfoil) to prevent burning
  • If you have the long 18 inch heavy duty tinfoil, it will be a lot easier. But I have used the smaller and very weak kind and it worked fine. I had to wrap one or two meals a 3 times, but the food still turned out great!
  • Prevent the potatoes from burning by covering them in a little oil. The easiest way to do this is to put them in a container with a little oil and shake them up.  
I remove them from the excess oil before adding them to the rest of the meal on the tinfoil.
 
 
Enjoy!!!


Best Ever Banana Bread

(Don't forget to check out the Summer Fun Challenge and Giveaway for June and I am still looking for Sponsors for July and August)


This is my family's favorite banana bread recipe. It turn out great every time! I am always surprised at how fluffy it is compared to other banana breads. Another bonus is that it is so easy to make that even my 4 year old son can do it. I helped him make a few mini loaves to give his teachers as a end of the year thank you. He was so excited to give them something he made and he made sure he told them that!


What You Need: 
  • 2 cups flour
  • 1 teaspoon baking powder
  • 1/2 teaspoon baking soda
  • 1/2 teaspoon salt
  • 1/2 cup (1 stick) unsalted butter, softened
  • 1 cup sugar
  • 2 eggs, at room temperature
  • 1 teaspoon vanilla extract
  • 3 medium-large very ripe bananas (1 cup mashed)
  • 1/2 cup sour cream
  • Bread pans
  • 3 bowls (or 2 bowls and a blender) - 1 of them large for mixing
*Preheat oven to 325ยบ


Directions:

**The trick to great banana bread is, the less stirring you do once you add the wet and dry ingredients together, the lighter and fluffier the bread will be!

Step 1: Add peeled bananas and sour cream together. I like to use the blender to do this, but you can mash them together in separate bowl, too. I also don't wait for the frozen bananas to defrost completely before opening them. I find it less messy to set the bananas out for 20 minutes (or run under cool water for a few minutes) and then slice the banana peel a few times (the long way). The peel comes off nice and easy and the banana is still whole. Then I set the banana aside to finish thawing while I mix everything else.


Step 2: In a separate bowl combine flour, baking powder, baking soda, and salt. Stir together and set aside.


Step 3:  In the large bowl cream the butter and gradually add the sugar. Add one egg at a time and beat well after adding each egg. Add the vanilla and mix.


Step 4:  Add 1/3 dry mixture and 1/3 banana mixture to the large bowl. Mix well, but not too much! (Remember the trick to great banana bread. See the beginning of instructions above). Add half of the remaining dry mixture and 1/2 of the remaining banana mixture. Mix well, again. Then add the last of the dry and banana mixture and mix. If using the mixer, I do quick starts to the mixer until I do not see any more dry mixture. It should mix pretty easy.

Yes, and we must not forget about the tasting! This is his favorite part!


Step 5: Pour batter into well greased bread pans. Add mix-ins, if wanted and stir them in lightly. We love to bake them in mini loaf pans for gifting and our favorite mix-ins are chocolate chips and/or craisins.


Step 6: Bake in oven. For large bread pans around 70-75 minutes (or until you can stick a fork in it and it comes out clean). For mini bread pans, it will be around 50-55 minutes depending on your oven (or until the fork trick!). Times may vary with ovens and elevation. Once removed from oven, let bread cool 20 minutes before removing it from the pan. I find using a butter knife and going around the edge of the pan (between the bread and the pan), helps the bread come out all in one piece.


Enjoy!

P.S. I know I'm missing a picture of the bread. I meant to take one, but I guess it never happened. I will have to snag one from the next batch we make and add it later. So, sorry! But just think "yummy good!"

I found this recipe while at a dentist appointment and flipping through a Family Fun magazine. My dentist was so nice that he made a copy of the recipe for me. What a great find!

Yummy Soft Pretzels

Here is the pretzel recipe I talked about previously. I finally found and tried an alternative way to make them and it worked! No more soggy pretzels! The kids have a lot of fun rolling these out and creating. Their favorite thing to do is to create little people. And best of all, these pretzels are oh, so yummy! Here is the recipe:


Ingredients:

Dough
  • 1 1/2 cup warm water
  • 1 1/8 teaspoon active dry yeast
  • 2 tablespoons brown sugar
  • 1 1/8 teaspoon salt
  • 1 cup bread flour
  • 3 cups regular flour
Soda Solution
  • *2 cups Warm water
  • *2 tablespoons baking soda
* Alternative: instead of using the 2 cups water and the 2 T baking soda use 1 beaten egg (or if you prefer, 2 egg whites)

Topping
  • 1/2 stick of butter (you don't use all of it) - Sweet Butter is one of "Aunt Annie's" secrets
  • Cinnamon/Sugar mix for cinnamon pretzels
  • Coarse salt
  • Or other favorite topping
Makes 2 pans or about 12 pretzels


Directions:

Sprinkle yeast on lukewarm water in mixing bowl; stir to dissolve. Add sugar, salt and stir to dissolve; add flour and knead dough until smooth and elastic. (I had to add at least 1/4 cup more water, because it was just too dry.) Let rise at least 1/2 hour.


While dough is rising, prepare a baking soda water bath with 2 cups warm water and 2 Tbsp baking soda. Be certain to stir often (or prepare your beaten egg).


After dough has risen, pinch off bits of dough and roll into a long rope* (about 1/2 inch or less thick) and shape. This is the fun part...Let your children create whatever they can come up with; monsters, people, animals, or making a basic pretzel is just fine, too!

Pretzel people are their favorite to make and balling up the dough and carrying it around in a cup is okay, too! That kept our little friend occupied for a bit!

His man has a lizard head and snake head feet...his own idea!


Dip pretzel in soda solution and place on greased baking sheet. Soda solution works great if you are making a regular pretzel design, but if you are making animals, people and anything else, the egg works better. Alternative: Brush Pretzel with egg, using a spoon. It will give it that nice shine after you bake them.

After coated with the beaten egg and waiting to rise


Allow pretzels to rise again. (Letting them rise is best, but if you are short on time or patience, I set my oven to 200 and let them rise in there for 5 - 10 minutes) Bake in 450 oven for about 10 minutes or until golden (closer to 7 -8 minutes worked best for me). Brush with melted butter and enjoy!


Toppings: after you brush with butter try sprinkling with coarse salt. or for Auntie Anne's famous Cinnamon Sugar, try melting a stick of butter in a shallow bowl (big enough to fit the entire pretzel) and in another shallow bowl make a mixture of cinnamon and sugar. Dip the pretzel into the butter, coating both sides generously. Then dip again into the cinnamon mixture. I use the stick of butter and brush it over the pretzels just after they get out of the oven. (I didn't have a shallow bowl big enough to dip the pretzels into!) And it was easier for me to put a pretzel on a plate and sprinkle the salt or the cinnamon/sugar mix on the pretzel rather than dipping the pretzel into the topping. 


* The longer and thinner you can make the dough rope, the more like Auntie Anne's they will be. The easiest way to get this is by holding the two ends of your dough rope and kind of treating it like a jump rope by swinging it. It will start to stretch out. Once the ends seem to be about the right thickness, then move your hands closer to the center and swing the middle. Swinging is much easier than trying to roll it out to get it long enough!

For us, it worked best for my son to hold one end of the "rope" while I held the other and then we would swing it. He got a little frustrated doing it on his own.


Oh, so good!


And of course, if you leave the room, tell someone that the timer is set for the pretzels that are baking in the oven or this may happen....

The picture does not do them justice. They were rock hard and dark brown!


This recipe can be found  at the CDKitchen under the name "Aunt Annie's Soft Pretzels." I made some of my own enhancements to the recipe!

Fruit Smoothie - Yum, Yum!

The weather is getting warmer (and staying warmer, no snow again here!), the trees are getting greener and there are a ton of strawberries at the store! I love warm weather for many reasons, but one of my favorite reasons is because it means that we get to have our favorite treat everyday, if we wanted to. There is nothing better than a cold fruit smoothie made from fresh (or frozen) fruit on a warm day. Yum! It also makes me feel like a better mom because my kids are getting in more fruits and veggies. Yes, I said veggies! I love to add spinach to our smoothies. It does not change the taste and it is good for you. The best of both worlds! Another reason I love to make smoothies so much is because my children really enjoy helping make them, too, making it a really easy and rewarding activity!

Here is how we make ours and I'll explain the veggies further down.


What You Will Need:
  • Orange juice - fresh or frozen concentrate
  • Fresh or Frozen berries, you choose (we love to add strawberries, blue berries, black berries, and raspberries) 
  • Banana
  • Spinach - fresh or frozen (see tips below if your child has a problem with it)
  • Ice cubes/water
~ Also, see variations below...

* This recipe will make 5 to 6 glasses with 6 oz of smoothie


Directions:

Add a handful of strawberries (usually ends up about 6 strawberries), add 1-2 handfuls any additional berries you are adding, add 1 medium sized banana, and 1 handful of spinach leaves. Then add about 1/4 cup of orange juice concentrate (1 cup if not concentrate). If your berries are fresh, add 1/2 to 1 cup ice cubes to the mix that way you can make sure your smoothie is cool, otherwise add 1/2 to 3/4 cups water. I eye this and aim for 3x what I added of the concentrate.

 They love to help!


Now blend!

Make sure you taste it before you start handing it out and that it does not taste too sweet or too blah! Sometimes I have to add a few more strawberries or another banana.

If you want it to be thicker, add more ice cubes. I usually have to do this when I use fresh fruit!

If you want it to go further than the 5 or 6 cups without having to use anymore berries, add a banana and add more ice/water (and sometimes a little more juice). I was able to get a good 4 or 5 more glasses out of it!


And adding a straw seems to make it that much more enjoyable to drink! Mmmmm!


Spinach Tips: Every time I make this smoothie for someone new (especially teenagers) they usually cringe when they see me adding a leafy vegetable. My nieces will attest to that! I convinced them to take a little nibble out of a spinach leaf. Once they tasted it and saw that it didn't have much of a taste, they did not mind me adding it and even more so after they got their first taste of the smoothie. They loved it and I never heard them complain again! My kids do not even think twice about adding the spinach

P.S. I like using frozen spinach just because I do not have to worry about the fresh stuff dying if it is not used fast enough.


Variations

  • Instead of adding juice/water, add a small container of yogurt - different flavors give it a different twist. Add milk or ice/water to thin it out.

  • Add cranberry juice with the orange juice
And the list could go on and on, but I will let you get creative!


Other Tips: I find that the frozen fruit is more affordable when I buy a large bag of it from Costco vs. my local grocery store or even Wal-Mart.


Now go treat your taste buds!

Monster Goo

Get down and dirty with some Monster Goo! Yet another creation made from CORNSTARCH! I know you are thinking, "Another cornstarch project?" Cornstarch is seriously becoming a favorite of mine. It can turn into so many things! This is super simple to make and loads of fun. My kids played with it for a good 40 minutes. That is a lot for us!

Here is what you need:
  • Water
  • Cornstarch
  • Bowl
  • Mixing spoon or fork
  • A large cookie sheet or a clean flat surface to play on.
  • Food coloring (optional)

Directions

The recipe calls for 1/3 cup of water in a bowl  (if you want color, add it before you add the cornstarch - just a couple drops) and add 1/2 cup of cornstarch. Stir together.

The faster you stir the harder it will get to mix it up. Be patient and just dig in it good. It should mix up quickly and will look like liquid in the bowl when it is mixed all the way.

TIP: I don't know if it an elevation thing or what, but this recipe was way too runny. I added almost another 1/4 cup of cornstarch. You want the texture to be firm when you pick it up and liquid like when it is not moving. That sounds confusing, but you will know what I am talking about when you have it right!


Now the Fun Begins...


Here are some ideas of things that you can do with it:
  • Roll it into a ball in your hand and then see what happens when you stop.
  • Create a monster. Roll it up again and then lay it on the table (or pan) and add 2 marbles for eye balls to create a monster. Watch him turn into "Monster Goo"
  • Talk about the texture of what they feel. Is it hard? soft? sticky? slimy? Are your hands soft or rough?, etc...you get the idea!
  • Give them a couple of bowls/cups and/or spoons and let them transfer the Goo from one to another.
  • For older kids, see if they can recreate the Goo consistency on their own. It really is fascinating for all ages!
TIP: If the Goo gets too dry and is not turning into liquid as fast as before, just add a little water and the fun will continue.


Cleaning Up Tips

  •  Do not put the mixture down the sink when you are finished. Leave it out until it dries a little and then put as much as you can in the trash. I have heard that some of these cornstarch mixtures can clog drains.
  • When trying to clean off your playing surface, use the mixing spoon or your hand to gather all the dried pieces on the table and throw them away (see picture above). Then wipe it down with a dry rag. Since it turns into powder it makes it a lot easier to clean up. Then you can use a damp cloth if you have anything left. When I did this before, I wiped down the table with a wet rag and I was forever seeing powder streaks.
  • The same thing goes with any of the mixture that gets on clothing. Let it dry and then shake it off. It will be much easier to get off if it is not wet!

HAVE FUN!!!

Cupcake Ice Cream Cones


These cupcake ice cream cones have been a favorite of ours for birthdays and special occasions for a couple of years now. They are easy to make and all ages seem to really enjoy them. I thought this was the normal way of making them and discovered that there was another way of making them. The other way to make cupcake ice cream cones is to put the cake batter in the cones and cook them standing up in the oven. I then was told of how they tipped over or burned and as you can imagine, it was really messy. I will admit that I found the instructions for this version on the side of a cake mix box. I tried looking for it online and could not find it. So, for your enjoyment here is how you make them:

Items Needed:

  • Favorite box cake mix

  • Ice cream cone cups

  • Cupcake baking cups

  • Cupcake pan

  • Frosting/decorations


Directions
1.  Make the cake mix as directed on the box.

2.  Place cupcake wrappers in the cupcake pan


3.  Fill each cupcake 2/3 full of cake batter. (If you have a metal cupcake tin, you can pound it lightly on a hard flat surface (i.e. table, counter, floor) to help get any air bubbles out. This will help the cupcake cook evenly and prevent the cones from tilting. If you do not pound it, it will not make a huge difference but your cones when completed may have a little more personality to them! )


4. Next, place the ice cream cone upside down on top of batter. You don’t need to press it down, just make sure it is touching the batter (see picture below).

(Sorry, this picture is actually of the cupcakes after baked. I forgot to take a picture prior, but wanted to give you the general idea of what they should look like prior to putting them in the oven.)


5.  Then bake in the oven as directed on the box for cupcakes.

(Another fun activity...watching the transformation from dough to cake!)


6.  Let the cupcakes cool


(The batter was closer to half filled with most of these cupcakes in this particular batch and so the finished product with 2/3 full will look more like the front center cupcake. Sorry for the confusion!)


7.  Once the cupcakes are cool, you can remove the wrapping and stand them up on the cone. Then frost, decorate....


....and Enjoy!

The Best Pizza is Made at Home!

We love homemade pizza here in our house and the kids love to help us make it! We will make it for birthdays, friends, movie night or anything else we can find an excuse to make it for. This dough recipe is the best I have found. There is no waiting for the dough to rise. Just make it, roll it, top it and bake it!  Here is what you need... (p.s. this is the same dough recipe I used to make the Heart Shaped Calzones)

Ingredients Needed:

(Dough)
  • 1 pkg. active yeast (about 2.5 tsp.)
  • 1 c. warm water
  • 1 tsp. sugar
  • 1 tsp. salt
  • 2 T. oil
  • 2.5 c. flour
  • 1 pizza pan or Jelly Roll pan - pre-greased
*Note: I will make 1.5x this recipe for 1 Jelly Roll pan/cookie sheet size pizza

(Pizza Toppings)
  • Pizza Sauce (I use Hunt's Mushrooms or Garlic and Herb canned spaghetti sauce - 1 26.5 oz can will make 2 to 3 Jelly Roll pan/cookie sheet size pizzas)
  • Any favorite toppings: sausage, pepperoni, peppers and tomatoes are our favorites
  • Shredded Mozzarella Cheese

Directions for Mixing the Dough


(Preheat oven to 425 degrees.) Dissolve yeast in warm water. Stir in remaining ingredients. Beat well with spoon or fork, if not using a mixer. You may need to add a little more flour depending on your elevation. I will add everything, but the last 1/2 cup and then I'll keep adding until it is just sticky enough that the dough does not stay on my fingers. Let rest 5 minutes. Mix dough and place on pre-greased cookie sheet. 


Directions for Making the Pizza

If you do not have a rolling pin, a sturdy glass or cup will work just as well. A rolling pin usually has a hard time on a Jelly Roll pan anyways.


 Separate the dough into 2 balls for 2 mini pizzas or 1.5x the dough recipe to have a full pizza with a good crust. Some children will need assistance putting enough pressure on the cup to actually roll it out.


First bring the sauce out. I put some sauce on the center of their pizza and then I let them spread it out on their own. It was hard for me to let them do it because I was afraid of the mess, but they did well. Then, I let the kids put on their own toppings of meat and veggies on their pizzas. If they did not put any veggies on it, that was ok with me, but I wanted to give them the option...and of course, tasting does happen, too! Next, add the cheese and then you are ready to bake.


Bake in the oven on 420 Degrees for 20 minutes
(or until the crust/cheese is starting to brown.)


And just so you can see what a large pizza will look like...


YUM!!! It is seriously so good!

Try it and let me know what you think! It's a simple meal to make, takes less than 20 minutes to put together and so much fun, too!

Valentine's Day Traditions


Here are some of the fun and simple Valentines' Day Traditions we are starting to share within our family each year:


Tradition #1

Boxes of Chocolates on Beds


Growing up on Valentine's Day my mom always made our bed and left a box of chocolates and when I was away at college she would mail me a box. It was always a fun treat! This year I was trying to be sneaky and grab the chocolates without my kids seeing them and accidentally bought a Transformer box for my daughter instead of the girlier one I meant to get her. Oh well, it will save me on the fighting!


Tradition #2

Decorating


I had a lot of fun making these with my kids...or my kids watching me make them! They helped in the beginning, but lost interest after the first little bit. They were real simple to put together and the kids enjoy looking at them hanging now in the kitchen.


Each year I like to put hearts on the walls. This year now that the kids can help we sat down one night and had everyone write one thing they love about another person in the family. Once they are all written down we read them aloud and then put them on the wall where we can see them all month. I love to glance at them throughout the day! It is fun at any age to see what they put down, but I think it is especially fun when they are young because you get phrases like this,


and like this,


hmm, he must have liked those muffins I made!


Tradition #3

Making Valentines


My son was asked to bring Valentine's Day cards to preschool and since he recently had a couple of days off we used the time to make some.  They are not super fancy, but he is pretty proud of them. Anything to do with sparkling confetti and glue is cool, right? And since we used basic shapes and letters that he recognized we were able to talk about them while he was "designing" them.


Tradition #4

A Fun Valentine's Dinner


I had so much fun planning this dinner and it made for a fun night together! I made Heart Shaped Calzones from my favorite pizza dough recipe  and stuffed them with our favorite pizza toppings (a little cheese on bottom, toppings and a couple T. of pizza sauce). And for dessert...


Yum! I made Strawberry/Cherry Jello Jigglers cut in to squares and topped with strawberry yogurt and strawberries. I don't know about your kids, but mine always seem to eat their food better when it is cut into smaller chunks and they gobbled this up!


I loved it and I think they did, too!

No matter what you do, big or small, do not forget the point is to share your love for those special people in your life!


What are your Valentine's Day Traditions? I'd love to hear them!


Site design by Fabulous K Creative | Powered by Blogger